
Deploying a setup in the cloud can vastly enhance your flexibility. Without the need to actually own any servers you can quickly spin up instances, so that you can scale up or down instantly. The fact that you can spin up a whole new environment in minutes also makes it much easier and quicker to test and develop new setups.
This blog post marks the start of a series in which we will explain how to deploy Unified Origin in the cloud, from scratch. It offers guidance and sheds light on several best practices that we have developed based on our own research and the experiences of our customers. The focus will be on Amazon Web Services (AWS), because this has proven to be the most popular cloud to deploy our software in.
Because this is the first installment of the series, it will go into quite some detail. This serves a specific purpose: the setup that is the subject of this blog post will be used as a basis for subsequent entries in this series, which will describe how to increase efficiency of the setup (by adding caching) and make it even more flexible (by containerizing it).
Do It Yourself
You can either read through the ‘how to’ part of this blog post for general guidance or you can follow it step-by-step to recreate the exact same setup. If you do the latter, please note that it will be deployed in AWS Region ‘eu-west‑1’, which is in Ireland.
Of course, deploying it in other AWS Regions is possible too, by changing all ‘eu-west‑1′ specific bits of the ‘how to’ to the AWS Region of your choice (do note that all links in the ‘how to’ that refer you to parts of the AWS Management Console are also ‘eu-west‑1’ region specific).
Overview of this blog
Because of the considerable length of this blog post, it is good to know that it consists of three parts. To start, the first part will provide you with an overview of the basic VOD setup that the ‘how to’ section of this blog post is all about. It will also give you some insight into the choices that we made regarding this setup.
The second part is the actual ‘how to’, which is the focal point of this blog post. It is subdivided into 14 sections:
- Create a Virtual Private Cloud (VPC)
- Create additional subnets
- Edit route table associations for additional subnets
- Create Security Groups
- Create VPC Endpoint
- Create S3 bucket
- Fill your S3 bucket with VOD Pack
- Restrict access to your S3 bucket
- Spin up first EC2 instance
- SSH into EC2 instance and configure it
- Test your configuration
- Launch and install EC2 instances in the other two subnets
- Add and configure Application Load Balancer (ALB)
- Complete setup with CloudFront distribution
Finally, a list with some further recommendations is the third part that serves as the conclusion to this blog post.
The basic setup
The below graphic shows the complete setup that you can recreate using the ‘how to’ section of this blog post. If you are familiar enough with the AWS environment, this overview alone will probably provide you with enough information to get you going. If not, the ‘how to’ should contain all information that you need to set it up, with or without any prior knowledge about AWS or our software.
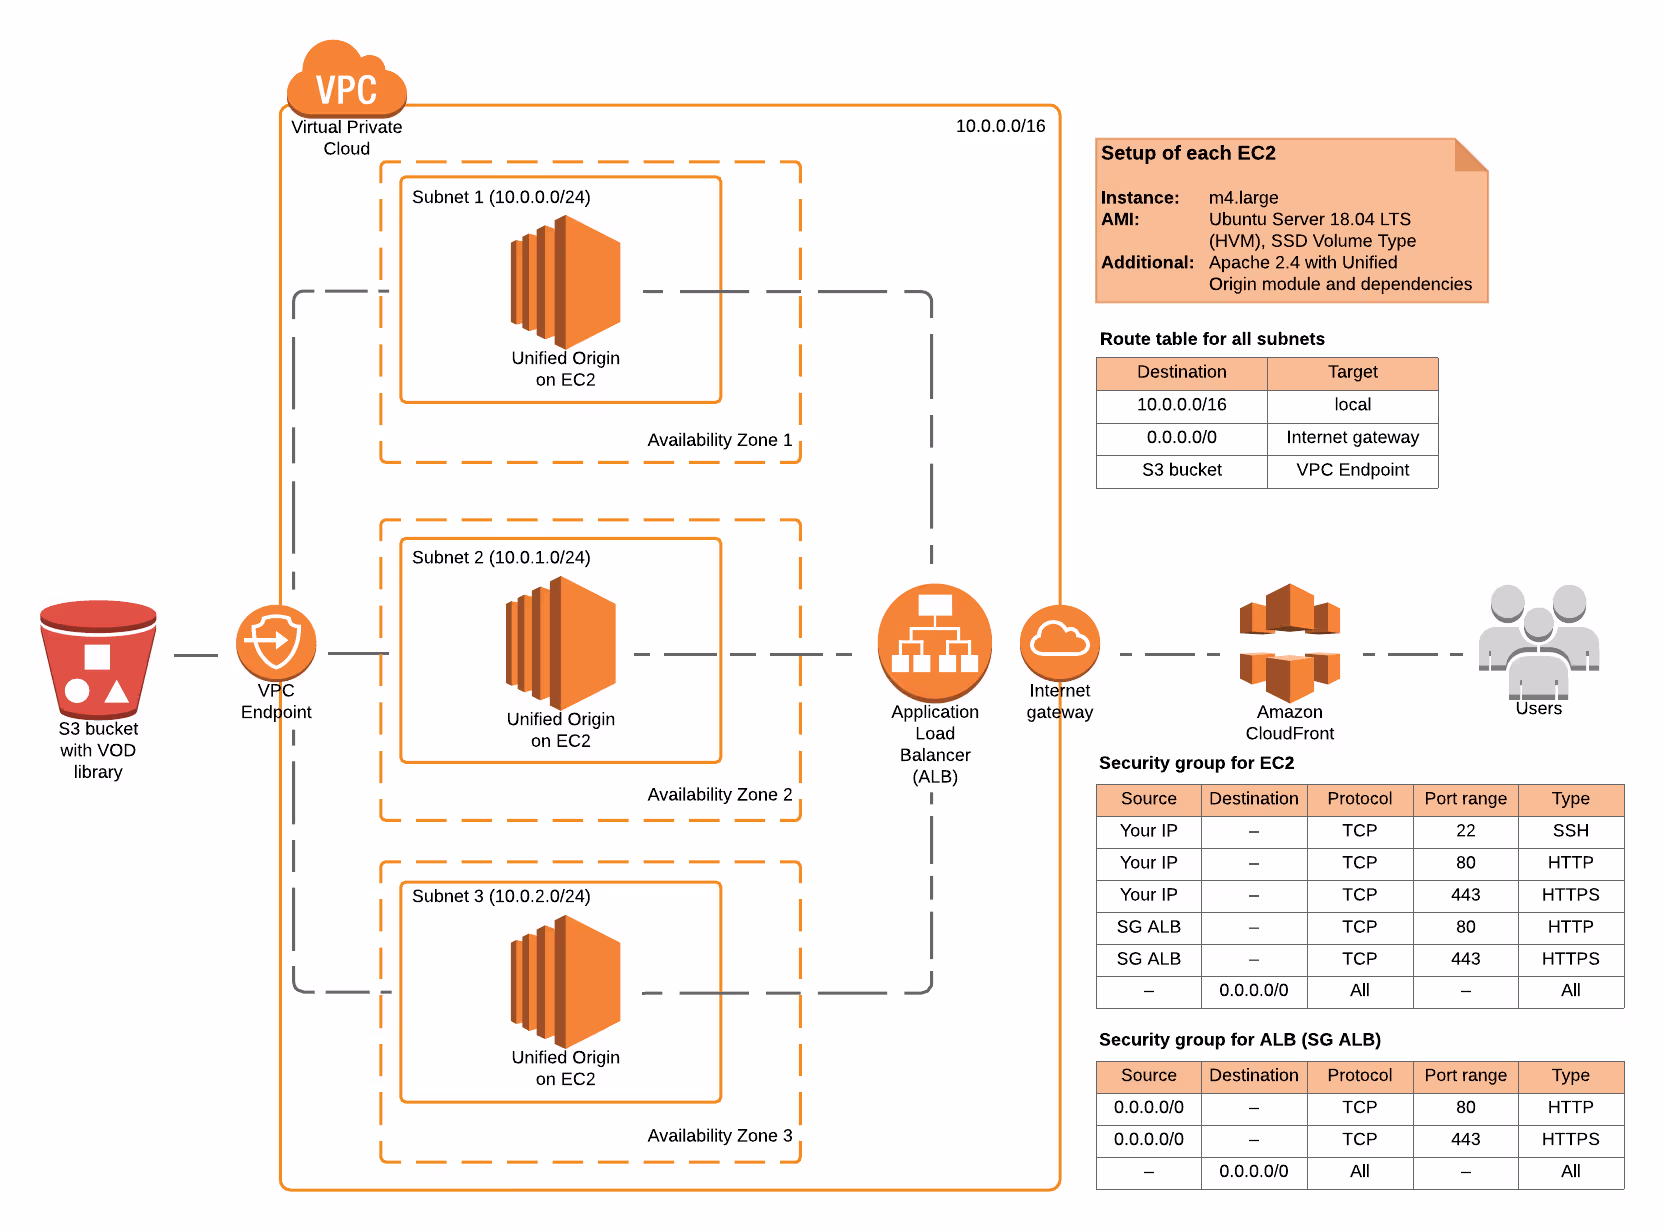
Figure 1: Overview of the basic VOD setup on AWS that the ‘how to’ section of this blog will let you recreate
What the ‘how to’ does not contain, is an explanation for the way that the whole environment is set up. To make the choices that we made more transparent, let’s get into the reasoning behind the different parts of the setup:
- Choice of Linux distribution
- Choice of instance
- S3 storage
- VPC Endpoint
- Multiple Availability Zones
- Application Load Balancer
- CloudFront
- Security groups
- Route tables
Choice of Linux distribution
Ubuntu is our Linux distribution of choice for this ‘how to’ because of its ease of use and general popularity. However, many other Linux distributions and Windows are supported for our software as well. For general installation instructions for each platform, please check the installation section of our documentation.
Choice of instance
Based on our own testing and the experience of our customers, we have determined that general purpose or memory optimized instances are the preferred choice when deploying Origin in the cloud. When setting up your own environment, you should of course benchmark it yourself because each use case is different, but our research has shown that the ‘m4.large’ instance is cost-effective and offers a good starting point.
S3 storage
This one is pretty straightforward. On AWS, if you have a big content library that you want to share across instances in a cost-effective way, Amazon’s Simple Storage Service (S3) is the obvious choice.
VPC Endpoint
A VPC Endpoint allows your instances to connect to a S3 bucket without leaving the AWS network. This is more efficient, and more secure because you can restrict access to your bucket (and the contents that are store inside it) to the Endpoint only, thereby blocking it from any traffic that comes from outside of your Virtual Private Cloud (VPC).
Multiple Availability Zones
We add redundancy to our setup in two ways: by running more than one Origin and by running these multiple Origins in multiple Availability Zones (AZs). Even if the amount of traffic you’re serving does not require an additional Origin, running one extra will ensure that if the first one fails for whatever reason you will have a back-up that can take over immediately. In addition, deploying your Origins across different AZs will ensure that if the infrastructure within one AZ fails, your streaming service keeps running.
Application Load Balancer
To divide the incoming request across your different Origins, you need a load balancer. The AWS environment offers several choices, of which the Application Load Balancer (ALB) and Network Load Balancer (NLB) are the most relevant. They both operate on different levels of the network stack. An ALB will redirect the actual HTTP requests, while a NLB will redirect the packets that carry the HTTP requests. This allows the first one to be ‘smarter’ and the second one to be ‘faster’. For this setup, we chose the ALB.
CloudFront
CloudFront is Amazon’s Content Delivery Network (CDN). Like any CDN, it will cache your content across a network of edge locations. This can greatly reduce the traffic that reaches Origin, thus allowing you to serve a much larger audience from the same Origin. In most cases it will also decrease the latency and amount of buffering that your customers will experience, because your content will be served from an edge location of the CDN that is much nearer to them than your server that runs Origin.
Security Groups
On AWS, a Security Group acts as virtual firewall for your instances. It allows you to control inbound and outbound traffic. The setup of this ‘how to’ uses two Security Groups, one for the instances and one for the load balancer. The Security Group for instances will only allow inbound traffic from the load balancer and your own IP (the public address of the computer that you use to recreate this AWS setup). The Security Group for the load balancer on the other hand will allow all inbound traffic over HTTP(S). This configuration is kept simple for the sake of brevity and is not meant to be used within a production environment. One improvement you could make is to also restrict the inbound traffic to your load balancer, by only allowing requests from CloudFront. For more info about this, please see the recommendations section at the end of this blog post.
Route Table
A route table consists of a set of rules that are used to determine where network traffic is directed. The rules are called routes. The setup of this ‘how to’ uses only one simple route table with three rules. One rule makes sure that traffic destined for the VPC will be routed there, while another rule ensures that traffic for the S3 bucket will be routed via the VPC Endpoint and a third rule redirects all other traffic to the Internet Gateway that connects the VPC with the internet.
How to deploy Origin VOD on AWS
1. Create a Virtual Private Cloud (VPC)
- Go to: https://eu-west‑1.console.aws.amazon.com/vpc/home?region=eu-west‑1#
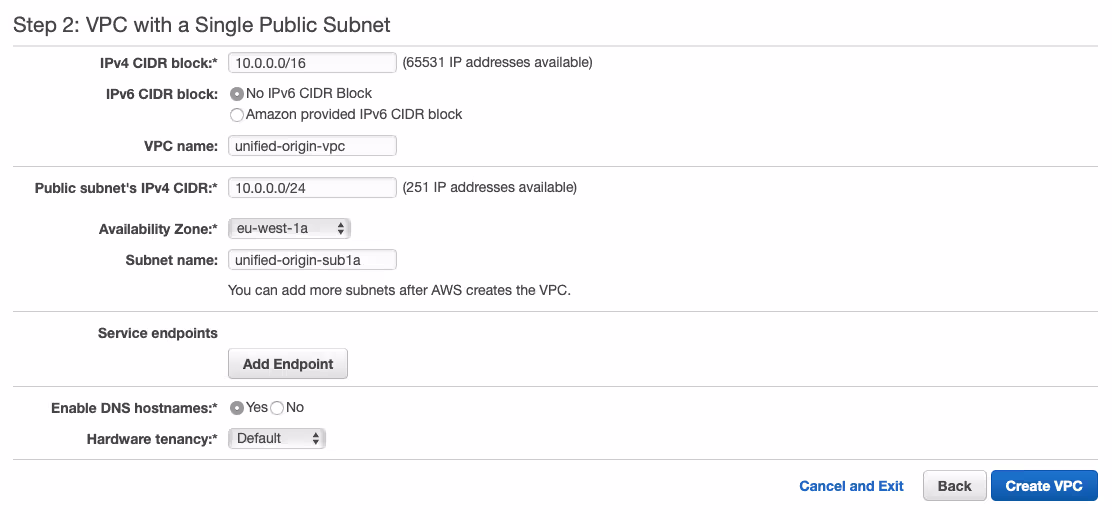
- Click ‘Launch VPC wizard’ to go to wizard, choose ‘VPC with a single subnet’ (default) and click on ‘Select’ to go to the configuration section.
- Specify ‘unified-origin-vpc’ as the ‘VPC name’, choose ‘1a’ as the ‘Availability Zone’, specify ‘unified-origin-sub1a’ as the ‘Subnet name’ and click ‘Ok’ to launch your VPC.
2. Create additional subnets
- Go to: https://eu-west‑1.console.aws.amazon.com/vpc/home?region=eu-west‑1#subnets:
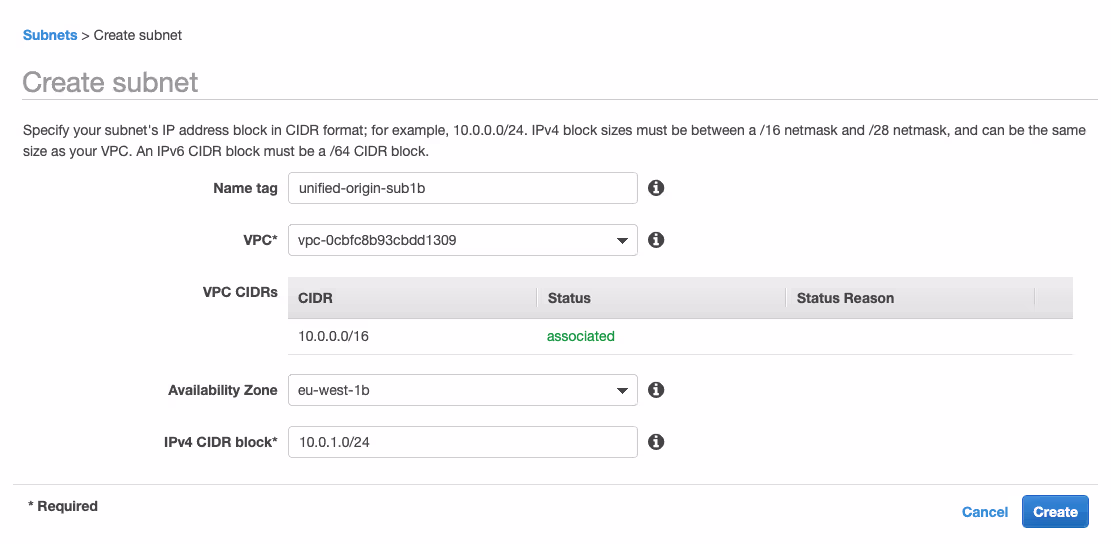
- Click ‘Create subnet’ to go to the configuration section.
- Specify ‘unified-origin-sub1b’ as the ‘Name tag’, choose the VPC that you have just created for ‘VPC*’, then choose ‘1b’ for the ‘Availability Zone’ and specify ’10.0.1.0/24’ as the ‘IPv4 CIDR block’.
- Click ‘Create’ and then ‘Close’ to continue to the overview of subnets.
- Again: choose ‘Create subnet’ to go to the configuration section.
- This time, specify ‘unified-origin-sub1c’ as the ‘Name tag’, choose your VPC as ‘VPC*’, then choose ‘1c’ for the ‘Availability Zone’ and specify ’10.0.2.0/24’ as the ‘IPv4 CIDR block’.
- Click ‘Create’ and then ‘Close’ to continue to the overview of subnets.
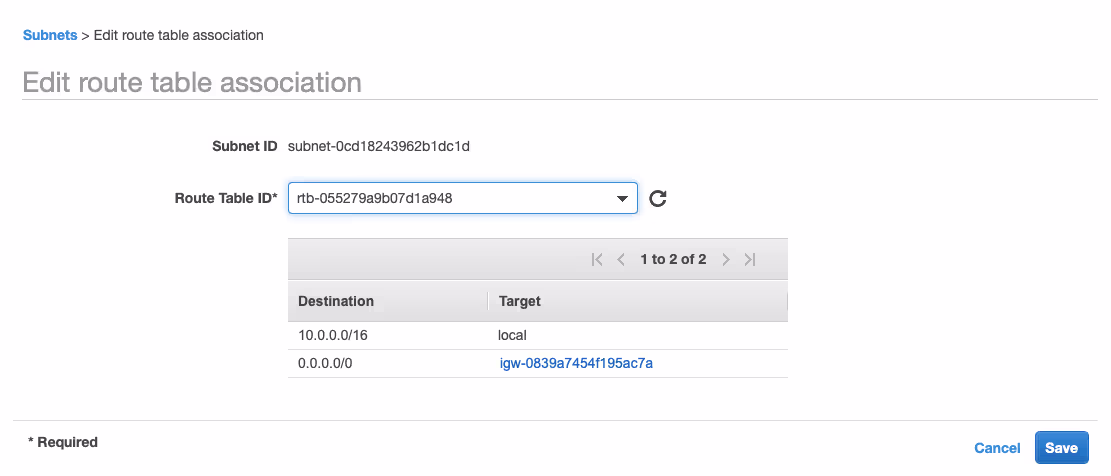
3. Edit route table associations for additional subnets
- In the overview of subnets, select ‘unified-origin-sub1b’ and choose ‘Edit route table association’ under the ‘Action’ button.
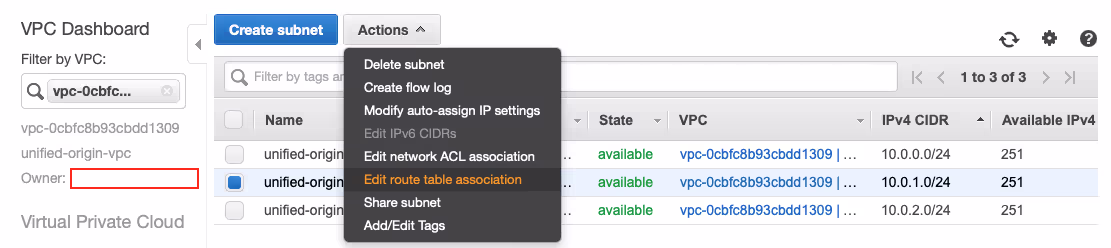
- Change the ‘Route Table ID*’ to the route table that includes an Internet Gateway (‘igw’), choose ‘Save’ and ‘Close’ to continue to the overview of subnets.
- Repeat these steps for subnet ‘unified-origin-sub1c’.
4. Create Security Groups
- Go to: https://eu-west‑1.console.aws.amazon.com/ec2/v2/home?region=eu-west‑1#SecurityGroups
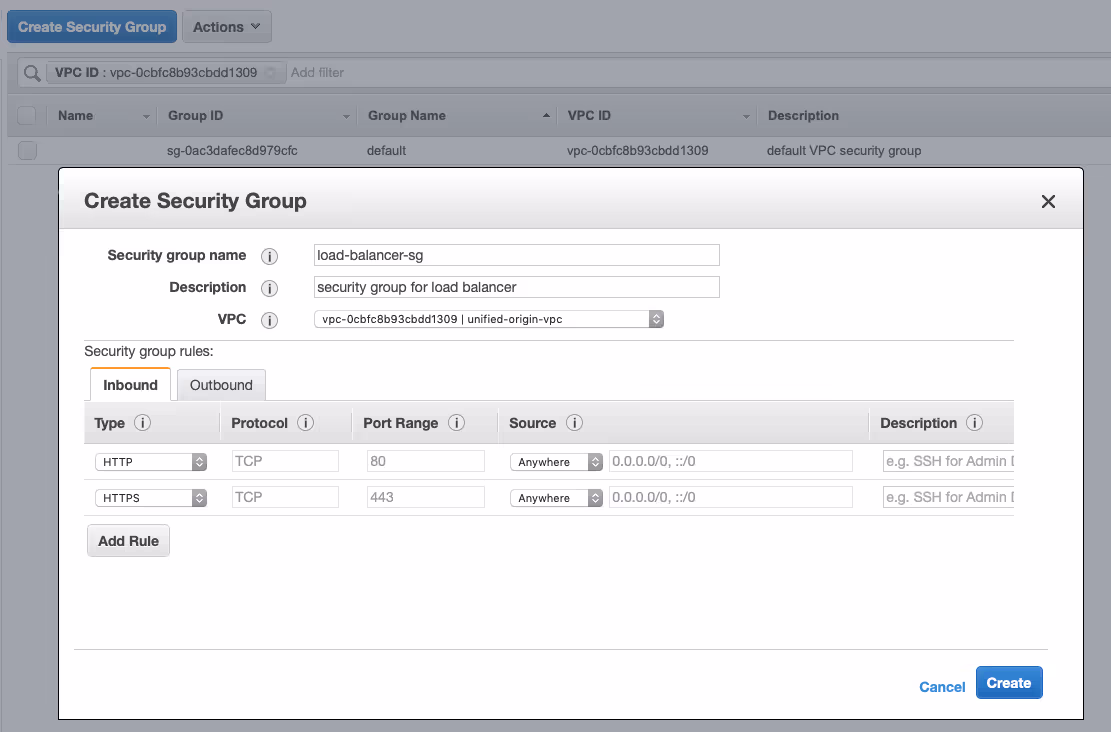
- Click on ‘Create Security Group’, specify ‘load-balancer-sg’ as the ‘Security group name’, add a description (e.g., ‘security group for load balancer’) and choose ‘unified-origin-vpc’ as the VPC, then click ‘Add Rule’ twice.
- Select ‘HTTP’ as the ‘Type’ for the first rule and ‘HTTPS’ for the second, then select ‘Anywhere’ as the ‘Source’ for both, and click ‘Create’.
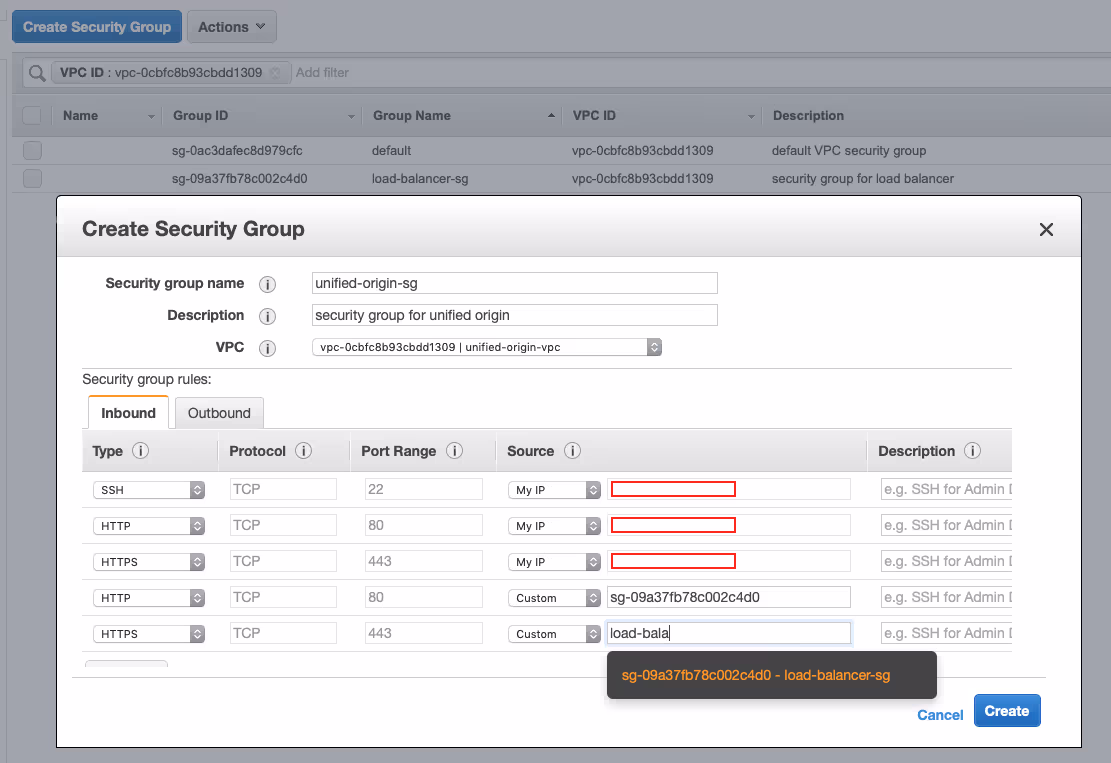
- Click on ‘Create Security Group’ once more, specify ‘unified-origin-sg’ as the ‘Security group name’, add a description (e.g., ‘security group for unified origin’) and choose ‘unified-origin-vpc’ as the VPC, then click ‘Add Rule’ five times.
- Specify ‘SSH’ as the ‘Type’ for the first rule and select ‘My IP’ as the ‘Source’, then specify ‘HTTP’ and ‘HTTPS’ as the ‘Type’ for two other rules and select ‘My IP’ as the ‘Source’ for both of them.
- For the remaining two rules also specify ‘HTTP’ and ‘HTTPS’ as the ‘Type’ but choose ‘Custom’ as the ‘Source’ this time and select the ‘load-balancer-sg’ Security Group for both, by specifying the ‘Group ID’ of ‘load-balancer-sg’ as shown below:
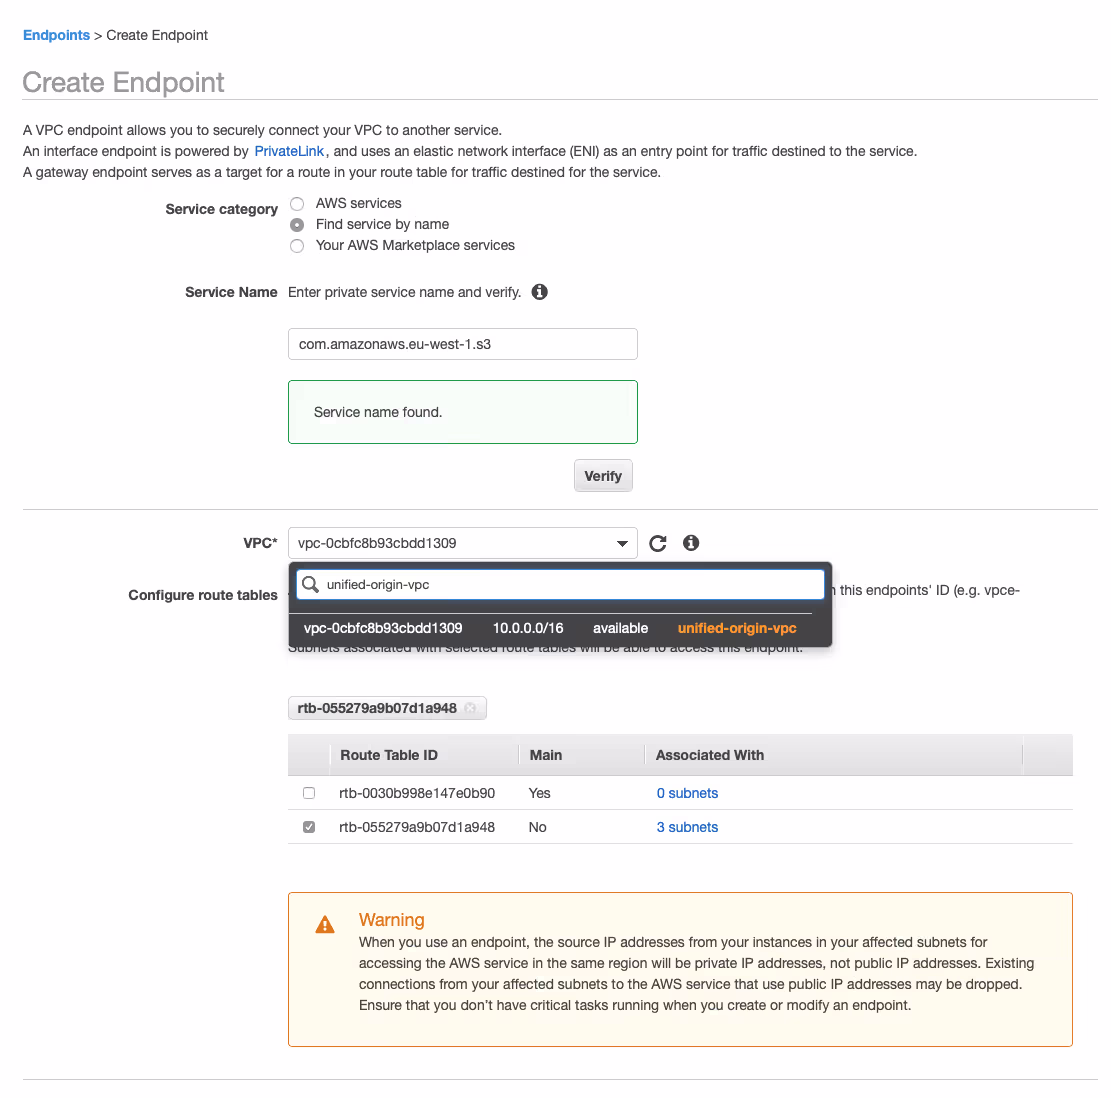
5. Create VPC Endpoint
- Go to: https://eu-west‑1.console.aws.amazon.com/vpc/home?region=eu-west‑1#Endpoints:
- Click ‘Create Endpoint’, then select ‘Find service by name’ for ‘Service category’, specify ‘com.amazonaws.eu-west‑1.s3’ for ‘Service name’ and choose ‘Verify’.
- Select the ‘unified-origin-vpc’ you created in the dropdown menu for ‘VPC*’.
- In the overview of the route tables of your VPC, two options should be visible, one with no and one with three subnets associated with it.
- Select the ‘Route Table ID’ that has three subnets associated with it.
- Ignore the warning, do not change anything about ‘Policy*’ (leave it on ‘Full Access’) and choose ‘Create endpoint’.
- Click ‘Close’ to continue to overview of Endpoints.
- Copy the ‘Endpoint ID’ because you will need it to restrict access to your S3 bucket later on.
6. Create S3 bucket
- Go to: https://s3.console.aws.amazon.com/s3/home?region=eu-west‑1#
- Click ‘Create bucket’, then specify a unique ‘Bucket name’ that starts with ‘unified-origin’, make sure the ‘Region’ of your ‘unified-origin-vpc’ is selected and choose ‘Next’.

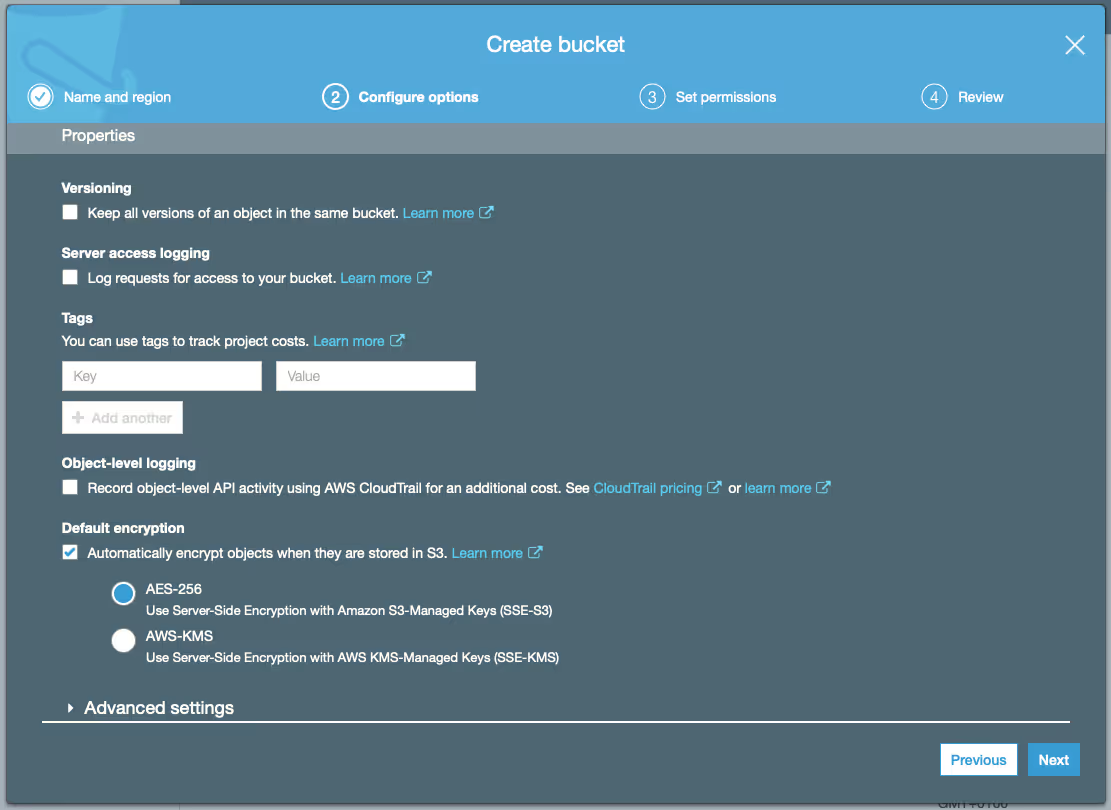
- Select ‘Automatically encrypt objects when they are stored in S3’ under ‘Default encryption’ (not required, but adds a layer of security to your content) and choose ‘Next’.
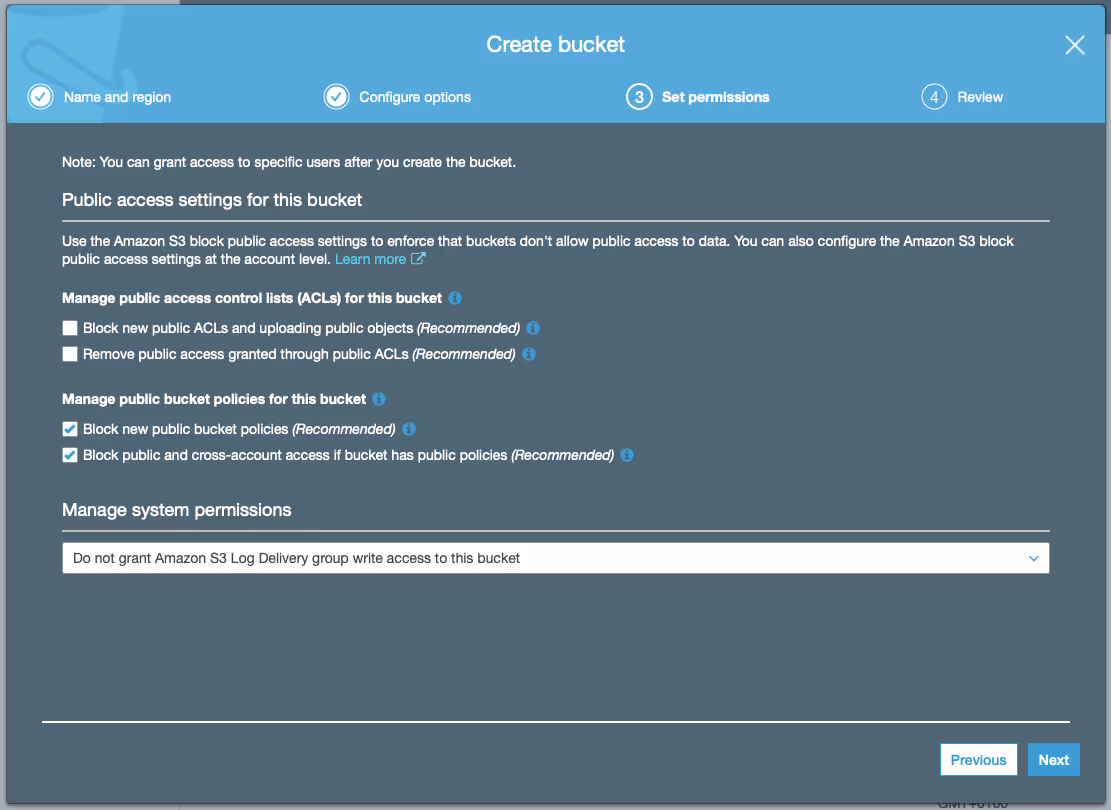
- Leave all the ‘Public access settings for this bucket’ on default and choose ‘Next’ again.
- The ‘Review’ of your bucket’s configuration should look like below (except for ‘Bucket name’). Choose ‘Create bucket’ if it does, otherwise go back and make the necessary changes before creating your bucket:
7. Fill your S3 bucket with VOD Pack
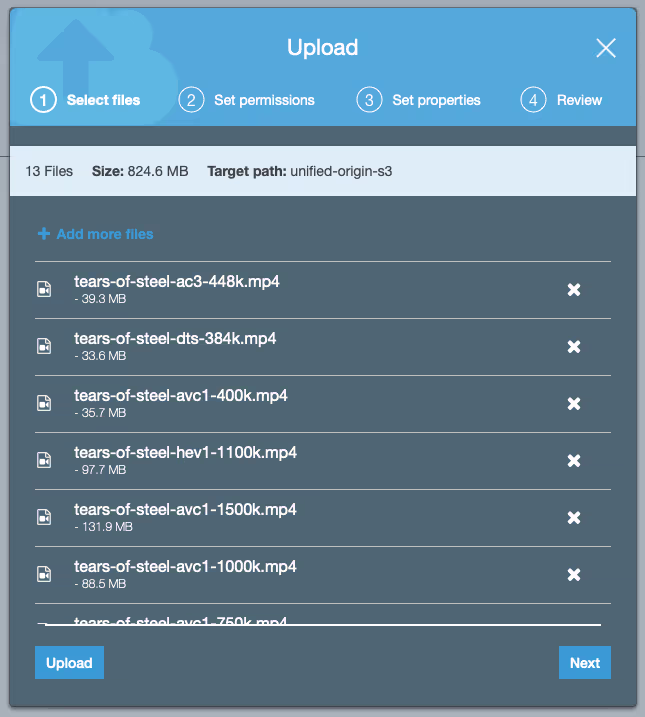
- Download Unified Streaming’s VOD Pack to your computer. This VOD Pack contains the Tears of Steel movie in multiple bitrates, encoded in a variety of codecs (you can find the .zip-file right here).
- Use your preferred tool to unzip ‘tears-of-steel.zip’ into a ‘tears-of-steel’ directory.
- Again, go to: https://s3.console.aws.amazon.com/s3/home?region=eu-west‑1#
- Click on the name of the S3 bucket that you have just created, then click either ‘Upload’ or ‘Get started’ and click ‘Add files’.
- In the menu that you are now presented with, select all files within the ‘tears-of-steel’ directory and use the menu to confirm your choice, then click ‘Upload’.
8. Restrict access to your S3 bucket
- In separate tab of your browser or after the uploading of all files has finished, go back to: https://s3.console.aws.amazon.com/s3/home?region=eu-west‑1#
- In the overview of your S3 buckets, click on the name of the bucket you created, go to the ‘Permissions’ tab and choose ‘Bucket Policy’.
- For the Bucket Policy you need your Amazon account ID, which you can find in the top right corner of you screen when your logged in to the AWS Management Console (it will look something like ‘1234 – 5678-9012’). In the screenshot below, both places where you can find your account ID are covered with a white rectangle with red borders:

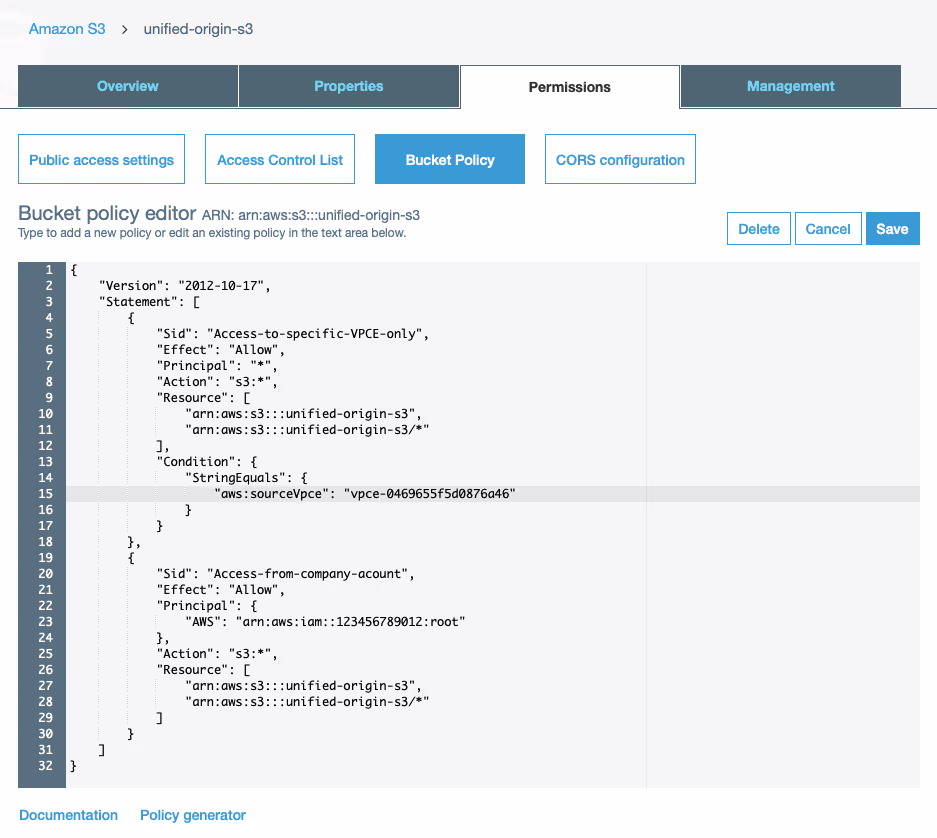
- Paste the below policy in the designated field and choose ‘Save’ (make sure to replace ‘<unified-origin-s3>’ with the name of your own S3 bucket, ‘<vpce-0469655f5d0876a46>’ with the ID of your own Endpoint and ‘<123456789012>’ with your own Amazon account ID):
{
"Version": "2012-10-17",
"Statement": [
{
"Sid": "Access-to-specific-VPCE-only",
"Effect": "Allow",
"Principal": "*",
"Action": "s3:*",
"Resource": [
"arn:aws:s3:::<unified-origin-s3>",
"arn:aws:s3:::<unified-origin-s3>/*"
],
"Condition": {
"StringEquals": {
"aws:sourceVpce": "<vpce-0469655f5d0876a46>"
}
}
},
{
"Sid": "Access-from-AWS-account",
"Effect": "Allow",
"Principal": "<123456789012>",
"Action": "s3:*",
"Resource": [
"arn:aws:s3:::<unified-origin-s3>",
"arn:aws:s3:::<unified-origin-s3>/*"
]
}
]
}
- In the AWS Management Console interface, this will look like below:
9. Spin up first EC2 instance
- Go to: https://eu-west‑1.console.aws.amazon.com/ec2/v2/home?region=eu-west‑1#
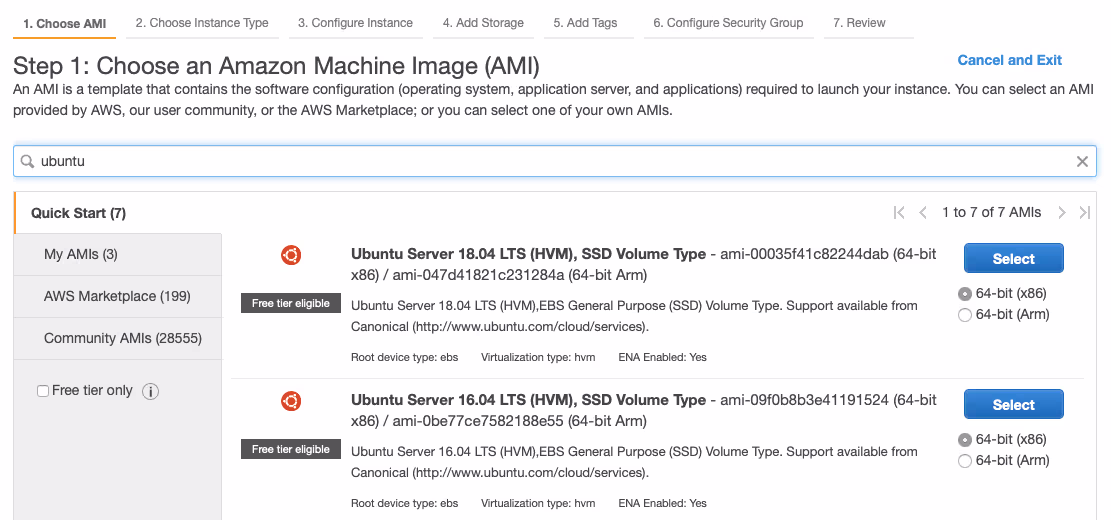
- Click ‘Launch Instance’ to go to configuration wizard, then search for ‘ubuntu’ and choose ‘Select’ for ‘Ubuntu Server 18.04 LTS (HVM), SSD Volume Type’.
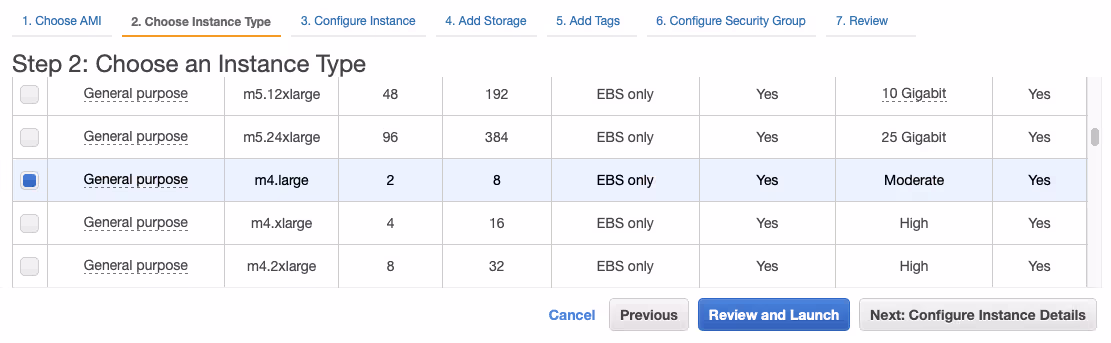
- In the list of Instance Types select the general purpose ‘m4.large’ instance and proceed by choosing ‘Next: Configure Instance Details’.
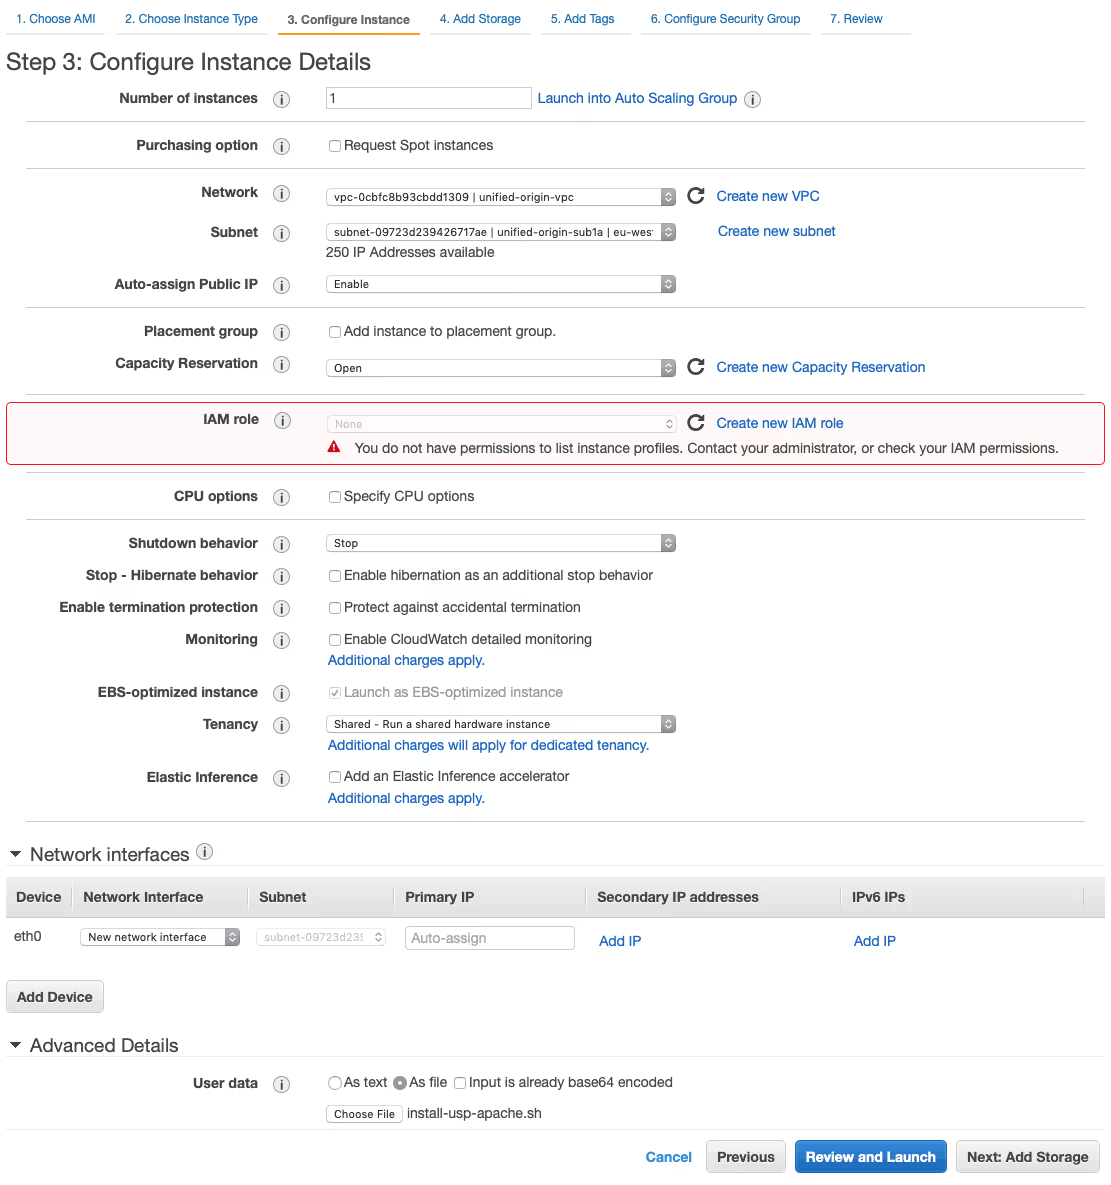
- Configure your Instance by selecting ‘unified-origin-vpc’ for ‘Network’ and ‘unified-origin-sub1a’ for ‘Subnet’ and choose ‘Enable’ for ‘Auto-assign Public IP’.
- At the bottom select ‘Advanced Details’, then select ‘As file’ and use ‘Choose file’ to select the ‘install-usp-apache.sh’ script, which you can download here.
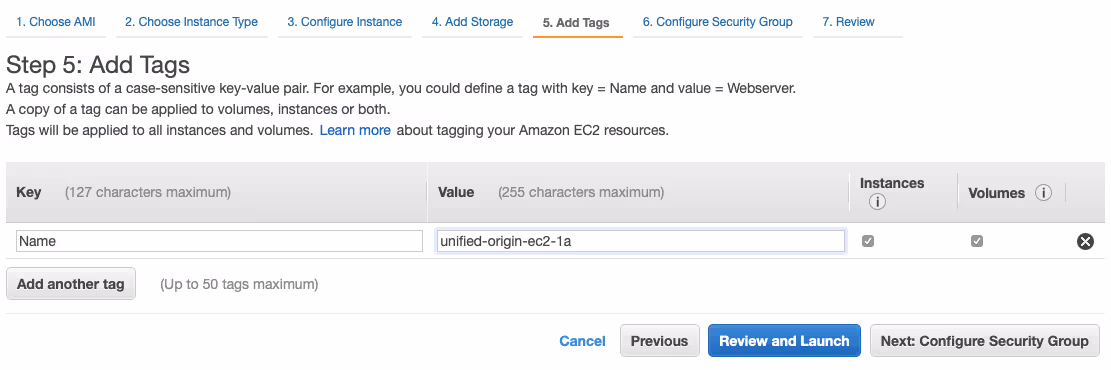
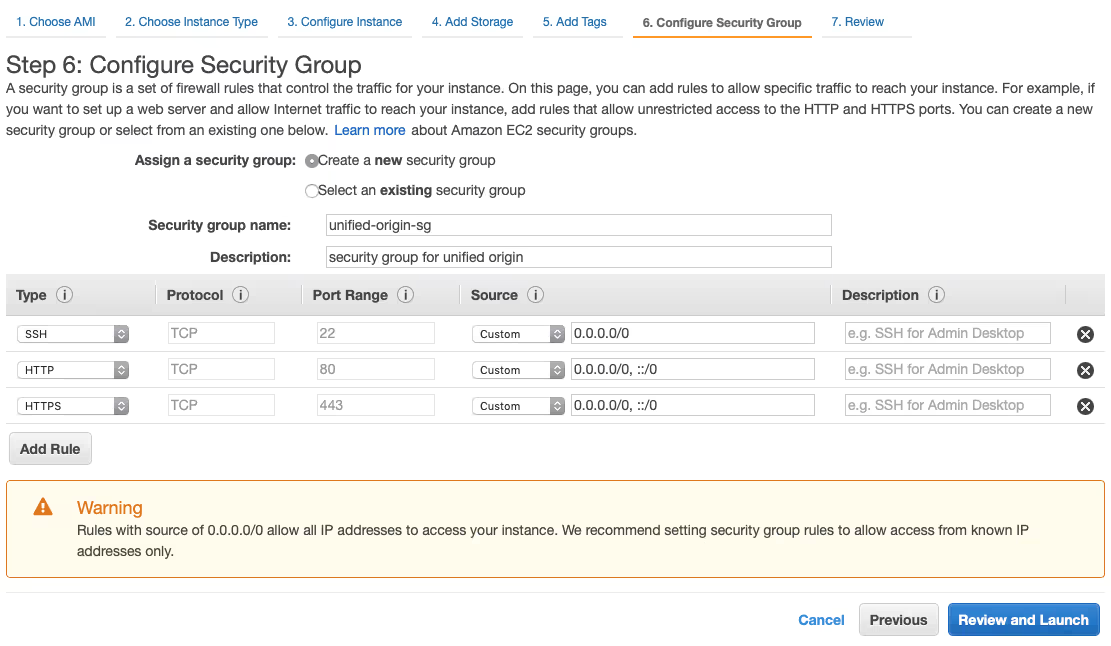
- Go to ‘5. Add Tags’ and specify ‘Name’ for ‘Key’ and ‘unified-origin-ec2-1a’ for ‘Value’, then choose ‘Next: Configure Security Group’ (bottom) or ‘6. Configure Security Group’ (top).
- Select the ‘unified-origin-sg’ Security Group and ‘Review and launch’.
- In the configuration overview that you are presented with choose ‘Launch’ and select either a key pair that you have used before, or create a new one by selecting ‘Create a new key pair’ from the dropdown menu.
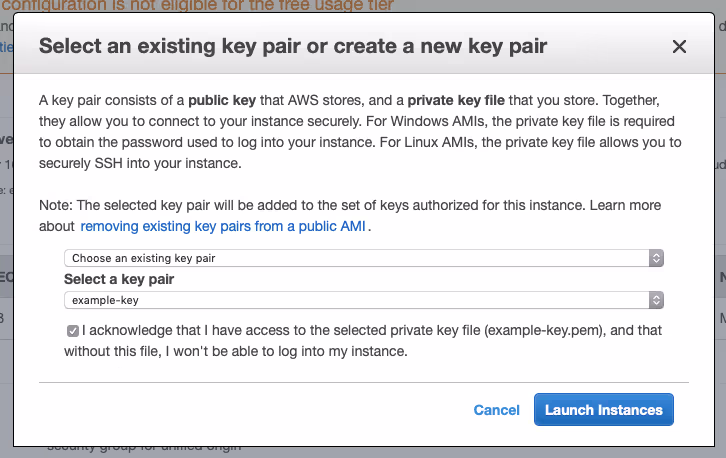
- If you create a new key pair, name it ‘example-key’, choose ‘Download Key Pair’, store it on your computer as ‘example-key.pem’ and make sure is has the correct permissions (‘chmod 400 example-key.pem’).

- Choose ‘View Instances’ to go to the overview of your instances, select your instance and choose ‘Connect’ for information on how to SSH into your instance.

10. SSH into EC2 instance and configure it
- Using your terminal, in the directory where you saved ‘example-key.pem’ run the SSH command that the AWS Management Console provided (or if you’re on Windows, use Putty).
- For example: ‘ssh ‑i “example-key.pem” ubuntu@ec2-54 – 229-58 – 141.eu-west‑1.compute.amazonaws.com’.
- Type ‘yes’ when asked ‘Are you sure you want to continue connecting (yes/no)?’.
- Note that Unified Origin and Apache are already installed by the script you specified when launching the instance, although they are not completely configured yet.
- Install your license key in ‘/etc/usp-license.key’ as root by running ‘sudo su ‑c “echo <your-usp-license-key> > /etc/usp-license.key“ ‘ (replace ‘<your-usp-license-key>’ with your actual key).
- Check whether if license key you is valid base64 by running ‘base64 ‑d /etc/usp-license.key’, and check for copy-paste errors in last step if key is not valid base64.
- Use ‘wget’ to download ‘install-vhost.sh’ from https://repo.unified-streaming.com/how-to-vod-on-aws/install-vhost.sh.
- Set the correct permissions on the script using ‘chmod +x install-vhost.sh’.
- Run the script as ‘sudo’ and specify the name of your S3 bucket on the command-line like so ‘sudo ./install-vhost.sh unified-origin-s3’.
- A virtual host with the below configuration has now been installed (with the ‘${aws_region}’, ‘${aws_az}’ and ‘${s3_bucket_name}’ replaced with proper values). This configuration uses ‘IsmProxyPass’ to fetch remote content from S3.
- To inspect the actual virtual host configuration that has been installed with all the proper values in place, run ‘cat /etc/apache2/sites-available/origin-*.conf’.
11. Test your configuration
- From the terminal of your instance, run ‘curl ‑v http://localhost/proxy/tears-of-steel-avc1.ism/.mpd’.
- This should return a HTTP 200 and print a DASH client manifest (MPD).
- The first part of the response (before the actual MPD starts) should look very similar to this:
* Trying 127.0.0.1...
* Connected to localhost (127.0.0.1) port 80 (#0)
> GET /proxy/tears-of-steel-avc1.ism/.mpd HTTP/1.1
> Host: localhost
> User-Agent: curl/7.47.0
> Accept: */*
>
< HTTP/1.1 200 OK
< Date: Tue, 18 Dec 2018 15:19:23 GMT
< Server: Apache/2.4.18 (Ubuntu)
< Access-Control-Allow-Headers: origin, range
< Access-Control-Allow-Methods: GET, HEAD, OPTIONS
< Access-Control-Allow-Origin: *
< Access-Control-Expose-Headers: Server,range
< X-USP: version=1.9.5 (15692)
< Content-Length: 9904
< Accept-Ranges: bytes
< Last-Modified: Wed, 12 Dec 2018 21:44:58 GMT
< ETag: "1"
< Content-Type: application/dash+xml
<
- After which the actual MPD is printed, the start of which looks like this:
<!--?xml version="1.0" encoding="utf-8"?-->
<!-- Created with Unified Streaming Platform(version=1.9.5) -->
<mpd xmlns:xsi="http://www.w3.org/2001/XMLSchema-instance" xmlns="urn:mpeg:dash:schema:mpd:2011" xsi:schemalocation="urn:mpeg:dash:schema:mpd:2011 http://standards.iso.org/ittf/PubliclyAvailableStandards/MPEG-DASH_schema_files/DASH-MPD.xsd" type="static" mediapresentationduration="PT12M14S" maxsegmentduration="PT1M" minbuffertime="PT10S" profiles="urn:mpeg:dash:profile:isoff-live:2011">
<period id="1" duration="PT12M14S">
<baseurl>dash/</baseurl>
<adaptationset ....<span="" id="selection-marker-start" class="redactor-selection-marker"></adaptationset></period></mpd>
- If the request returns a 404, make sure you did not make a typo and also check whether ‘X‑USP: version=1.9.5’ is part of the output to know if Unified Origin is installed properly (see the first part of the response above for an example).
- If it returns a 403, your license key is probably not installed correctly, or the permissions on your S3 bucket are wrong (please check your Bucket Policy).
- In case Unified Origin or your license key seems to be problem, check the general error log (‘cat var/log/apache/error.log’) and make sure that it reports ‘License key found: /etc/usp-license.key’.
- In case you suspect a configuration error with your S3 bucket, run ‘curl http://s3.<your-aws-region>.amazonaws.com/<your-s3-bucket>/tears-of-steel-avc1.ism’.
- If the request to your S3 bucket returns a valid response (a server manifest should be printed), the configuration of your bucket is okay.
- Note that a direct request to a server manifest (‘.ism’) should always returns a 403 if you request it from Origin (instead of directly from S3).
- If the configuration of your bucket is okay, there might be a typo in the ‘IsmProxyPass’ configuration of your virtual host (‘cat /etc/apache2/sites-available/origin-*.conf’).
- For further trouble shooting you should check Apache’s access and error log for Unified Origin’s virtual host (both located in ‘/var/log/apache2/’).
- When you cannot solve the issue, please contact our technical support and provide your logs, the virtual host configuration and the S3 Bucket Policy.
- If both the local request (using ‘localhost’) and the direct request to your S3 bucket worked, use your instance’s terminal to run ‘curl http://169.254.169.254/latest/…’.
- This request should return the public hostname of your instance, which looks something like ‘ec2-54 – 77-252 – 207.eu-west‑1.compute.amazonaws.com’.
- Use this public hostname to make a request from the terminal of your own computer, using ‘curl ‑v http://<public-hostname>/proxy/tears-of-steel-avc1.ism/.mpd’ (where ‘<public-hostname>’ is replaced by your public hostname).
- The response to this request should be identical to the earlier request that you made locally on your instance (i.e., it should return a HTTP 200 and print an MPD).
- If the remote request to Origin works well, everything is configured properly and you can proceed.
12. Launch and install EC2 instances in the other two subnets
- Again, go to: https://eu-west‑1.console.aws.amazon.com/ec2/v2/home?region=eu-west‑1#
- Select EC2 instance that you just launched, change subnet to ‘Configure instance’ and change value of ‘Name’ key in ‘Add tags’ to reflect changed subnet.
- After you have launched the two additional EC2 instances in the other two subnets, go through all the parts from step 10 for both of them.
- Note that because this setup is for testing purposes only, you can use the same evaluation license key for all three instances.
13. Add and configure Application Load Balancer (ALB)
- Go to: https://eu-west‑1.console.aws.amazon.com/ec2/v2/home?region=eu-west‑1#LoadBalancers:
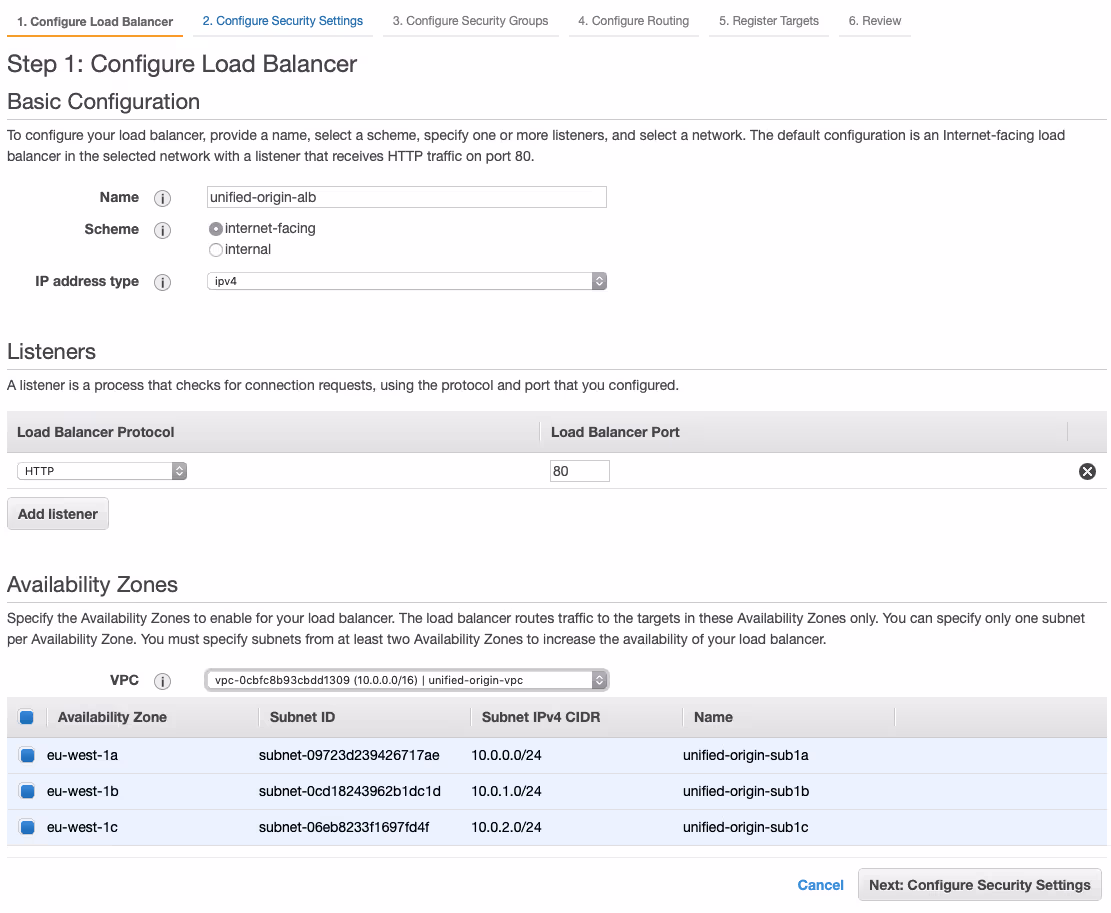
- Choose ‘Create Load Balancer’ and select the ‘Application Load Balancer’ (ALB) by choosing ‘Create’.
- Specify ‘unified-origin-alb’ as the ‘Name’ of the load balancer and select the ‘unified-origin-vpc’ from the dropdown menu under the ‘Availability Zones’ heading and select all availability zones that you have launched instances in.
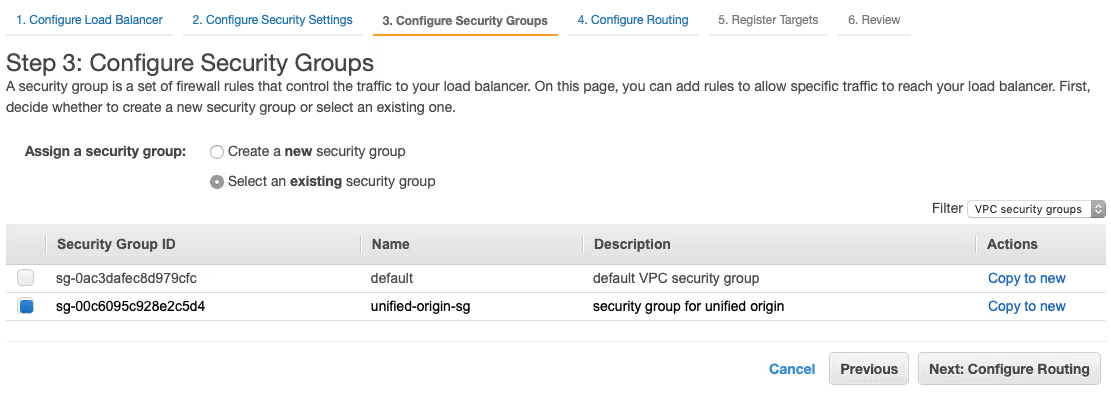
- Choose ‘Next: Configure Security Settings’ to proceed and ignore the security message by choosing ‘Next: Configure Security Groups’.
- Choose to ‘Select an existing security group’ and select ‘load-balancer-sg’, then choose ‘Next: Configure Routing’.
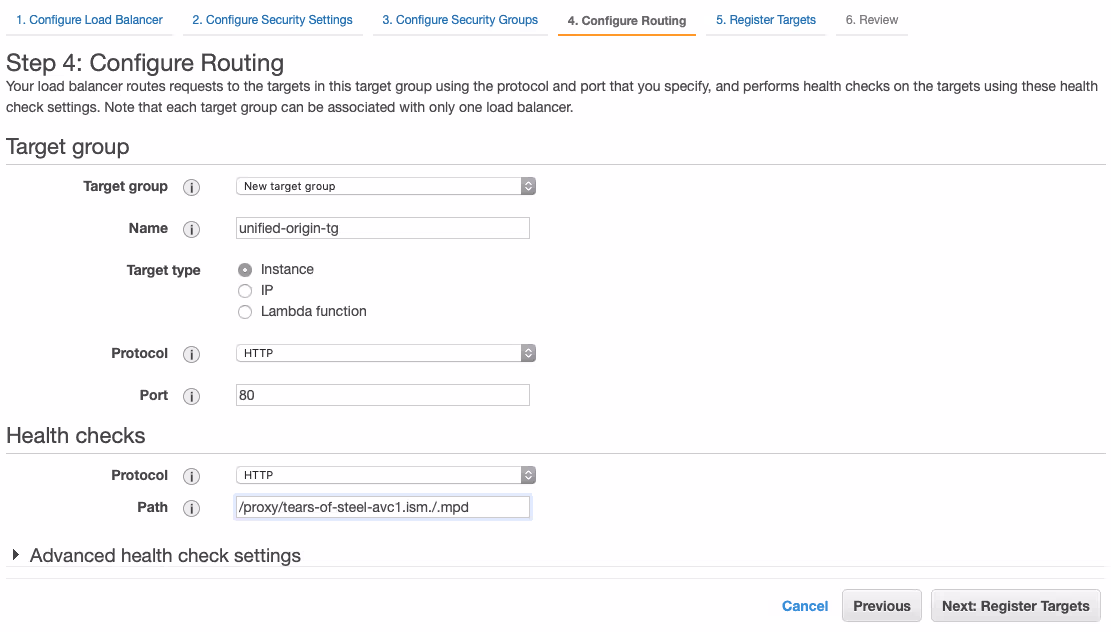
- Choose ‘New target group’ in the dropdown menu for ‘Target group’ and specify ‘unified-origin-tg’ as ‘Name’, then specify ‘/proxy/tears-of-steel-avc1.ism./.mpd’ as the ‘Path’ for ‘Health checks’ and choose ‘Next: Register Targets’ to proceed.
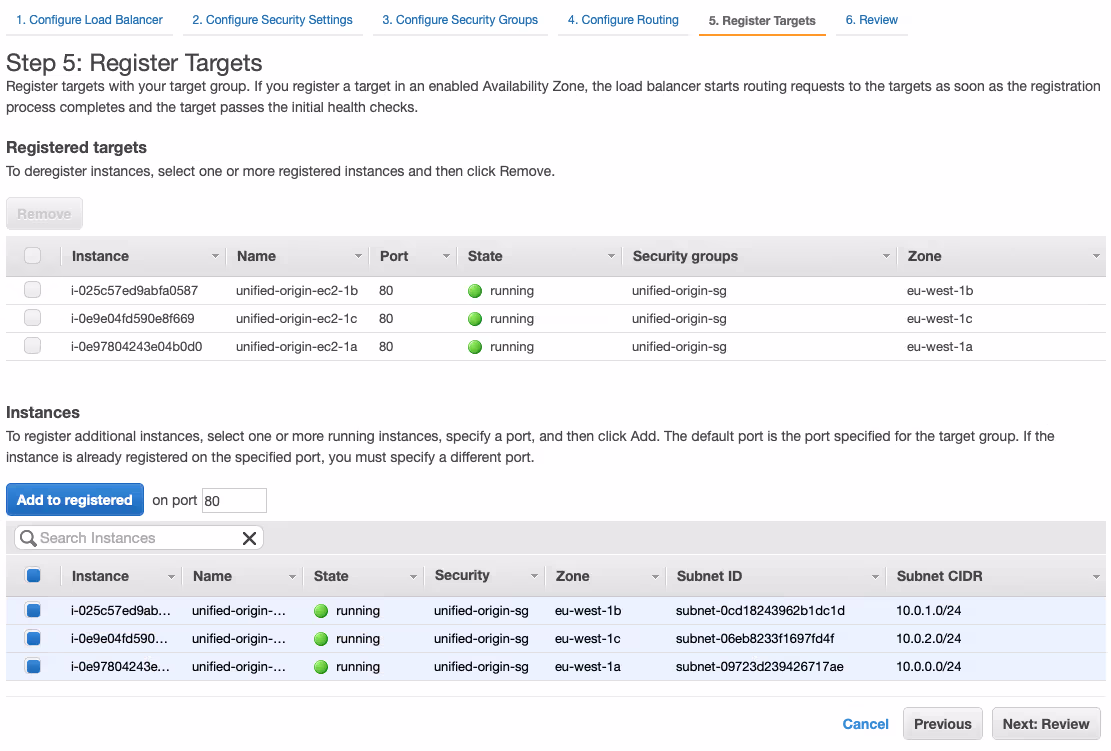
- Select all three instances in the table under the ‘Instances’ heading and click on ‘Add to registered’, then choose ‘Next: Review’ to proceed and choose ‘Create’ at the bottom of the ‘Review’ overview to create the load balancer.
- Choose ‘Close’ to return to the overview of your load balancers and check the ‘DNS name’ of the load balancer you just created.

- Check if everything works correctly by making a request for the MPD based on the ‘tears-of-steel-avc1.ism’ like we did earlier, but now through the ALB, like so: ‘curl ‑v http://<load-balancer-dns-name>/proxy/tears-of-steel-avc1.ism/.mpd’ (where ‘<load-balancer-dns-name>’ is replaced with the actual DNS name of your ALB, e.g. ‘unified-origin-alb-1377184234.eu-west‑1.elb.amazonaws.com’).
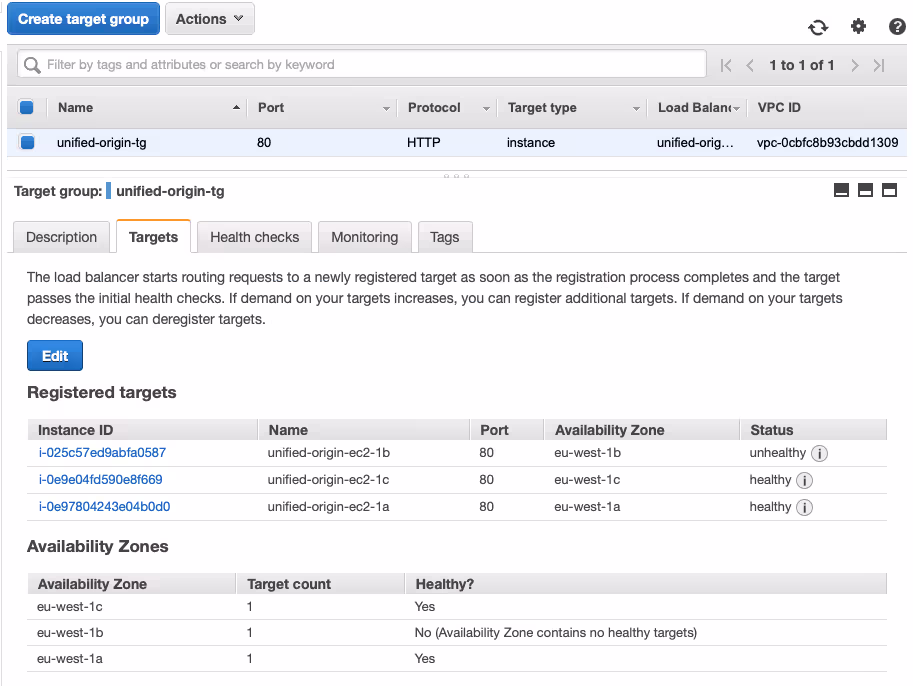
- If you experience any problems or want to make sure that your ALB is properly connecting to all instances, go to ‘Target Groups’ and select the ‘Targets’ tab to check whether all instances pass the ‘health check’ you have configured: https://eu-west‑1.console.aws.amazon.com/ec2/v2/home?region=eu-west‑1#TargetGroups:
14. Complete setup with CloudFront distribution
- Go to: https://console.aws.amazon.com/cloudfront/home?region=eu-west‑1#distributions:
- Choose ‘Create Distribution’ and ‘Get Started’ under the ‘Web’ heading.
- Using the dropdown menu for ‘Origin Domain Name’, select the Application Load Balancer you just created as the origin for CloudFront.
- Leave all other settings on default, scroll down and choose ‘Create Distribution’.
- Wait for about twenty minutes until your new CloudFront distribution is deployed.
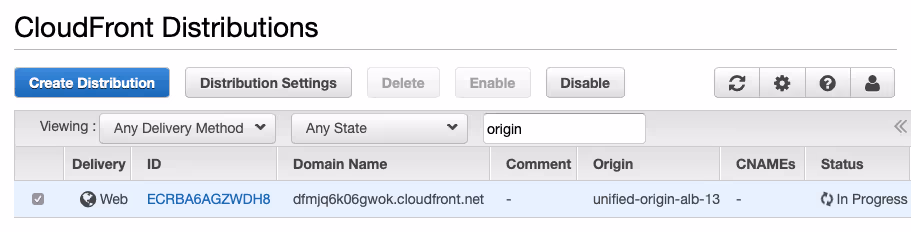
- After the status of your distribution has changed to ‘Deployed’, use the ‘Domain Name’ of the distribution to make a request for the MPD that we have requested before: ‘curl ‑v https://<distribution-domain-name>/proxy/tears-of-steel-avc1.ism/.mpd’ (where ‘<distribution-domain-name>’ is replaced with the actual domain name name of your distribution, e.g. ‘dfmjq6k06gwok.cloudfront.net’).
- If your request is successful, you have completed the full setup Unified Origin on AWS, as described at the start of this tutorial.
- To check the actual playout of video, you can use you player of choice to play DASH, HLS, Smooth or HDS. You can also use our VOD demo page to check this. In case of the latter, use ‘Location of client manifest:’ on the VOD demo page to specify the URL of the MPD that you requested in step 6. Then, press play. This should result in something like this:
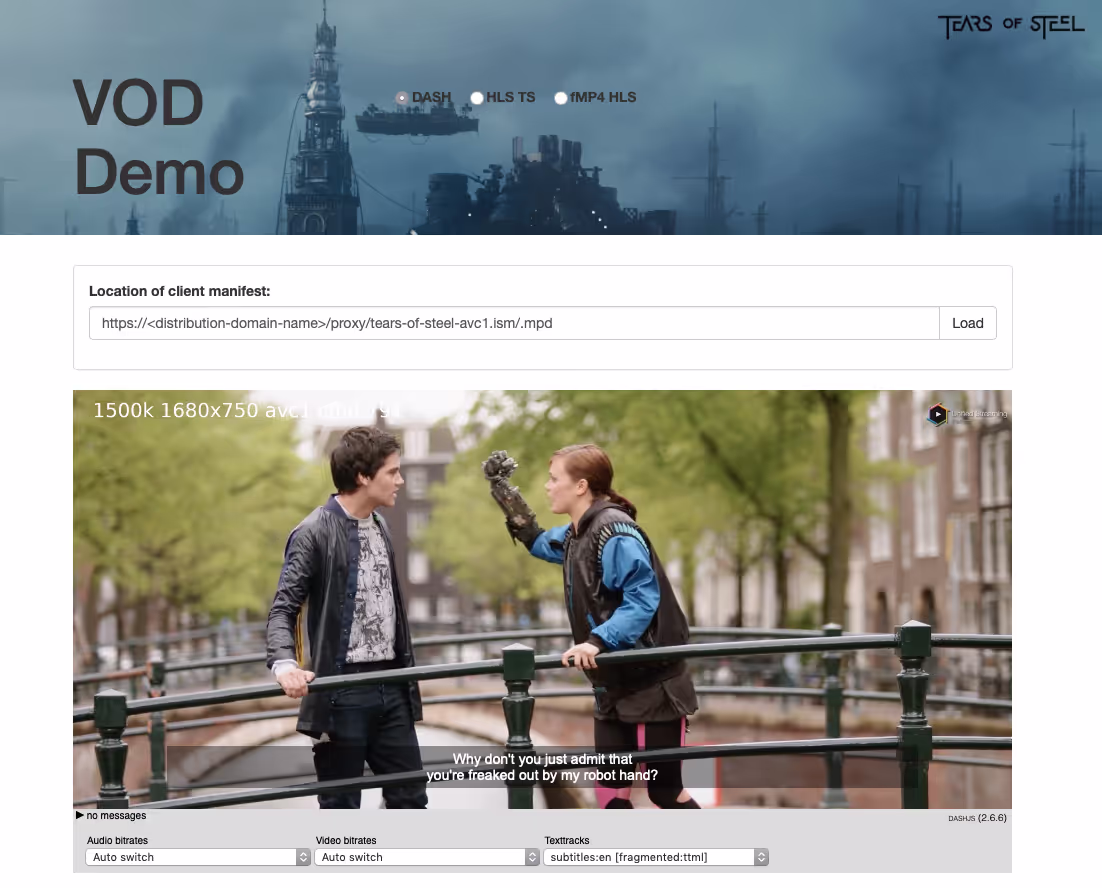
- You are now streaming content stored on S3, via a redundant Unified Origin VOD setup on AWS, through CloudFront. Congratulations!
Further recommendations
- To add some basic security to your load balancer, create a Lambda function that automatically updates in security group to only allow incoming traffic from CloudFront (which uses a dynamic range of IPs) or let CloudFront add a custom header with a shared secret and restrict access to your ALB by using Amazon’s Web Application Firewall (WAF) to block all requests that do not contain the header with the shared secret
- Secure the connection between CloudFront and your ALB by adding HTTPS to your ALB and restricting CloudFront requests to HTTPS only. Securing the connection to your Origins with HTTPS is recommended as well.
- Using fragmented MP4 (fMP4) instead of progressive MP4 for your media source files will greatly improve overall throughput from S3 as requests will be handled much more efficiently
- Work with data reference MP4’s (dref MP4) that you cache locally on your Origin alongside the server manifests to improve throughput efficiency even further
- Keep in mind that the setup described in this tutorial only uses a basic configuration of Apache, which should be tweaked per use case to get optimal results
- Add an additional layer of caching between your Origins and your load balancer to make your setup more robust
- Consider to containerize your setup completely for more flexibility and scalability
- Read the blog posts that will follow to learn more about how to do all this…
- And contact us if you want to talk about deploying Unified Origin in the cloud or if you have any other questions